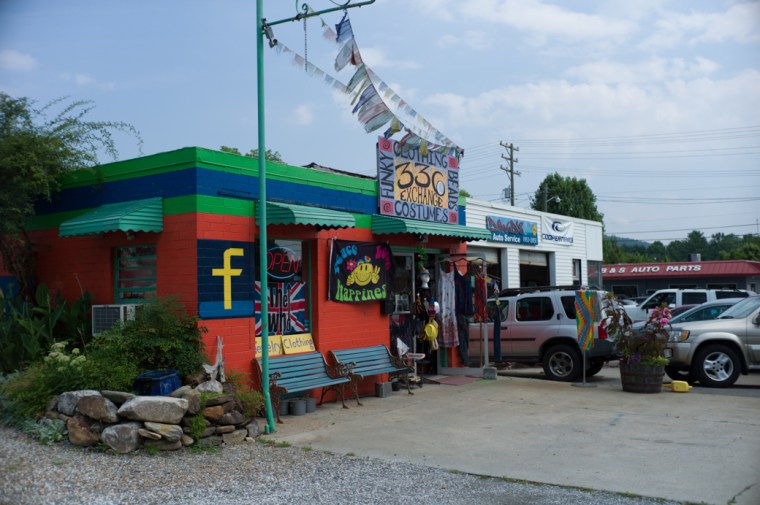
In my previous post Eddie asked some questions about how I process my color images from my Leica M-E. As promised I’d like to share how I developed the “F” is for Friday image.
I normally prefer to process my images to the B&W format but on occasion when I “feel” color would work better for my tastes that’s the direction I’ll go in.
The above JPG image was exported from Lightroom 5 (LR5) with no corrections and the camera’s embedded profile.
Eddie asked if I use any presets in my workflow. I have tried several of the “free” presets for LR5, including those that duplicate some of the Kodachrome film profiles. But I no longer use any of those. I have of course saved a couple LR5 Develop settings that I use frequently to save time, i.e., sharpening, vignettes and a yellow filter B&W setting.
When I upgraded to LR4 and now LR5 I invested in George Jardine’s LR Develop series and follow some of the techniques he teaches to get the most out of my files.
The one major addition I have made to LR5 is I did buy the Color Fidelity Huelight profiles for the Leica M9. I feel the Leica and Adobe Standard camera profiles over saturate Red and I’ve had trouble getting the skin tones I like with those profiles.
The next image is the image without any changes except the standard Huelight camera profile.

Before I begin making any adjustments I go full screen and see if I need to crop if I didn’t so well in framing my photograph. As you can see in this example I do have some lens vignetting in the upper left corner. I also check the histogram to see if I have any blown highlights or overly underexposed areas that I will need to work.

In the crop above I’ve also enabled LR’s Leica Lens Profile for my lens along with selecting Auto for to level and align the vertical objects in the image. This is a new feature in LR5.
I took this image with the Leica Summilux-M 35mm lens. My version was made in 1983. It’s prone to vignette when I shoot at wider apertures which I like to shoot. In this case I didn’t have my ND filter on and I was using f/2.8. Since the Leica digital M is a manual focus/aperture lens system there is no electronic information transferred the EXIF data when the image is captured. However, the shutter speed is recored and LR does its best to “guess” what the aperture was. The camera record a shutter speed of 1/3000s and LR says f/2.8 which is what I had set.
I try to do my best to ensure I have not overexposed the sky in daytime shots. The Leica M-E files can be underexposed a little and the shadow detail can be easily extracted in post processing. Below is the out of camera histogram:

Looking at the histogram you can see the white triangle in the top left of the histogram indicating I do have a very small part of the image underexposed. However, looking at the right side you can see I had room to increase exposure by 1/2 to 1 stop.
From here I see if I need to make any changes to the White Balance. I normally shoot a WhiBal card to get a manual in camera white balance setting. But in this case I had the camera set at Auto White Balance and it recorded a temperature setting of 5600 and a tint +16. Since there is a very close to white structure in the photograph I decided to take a white balance sample from it to see how much it changed the image. The new White Balance setting is now temperature 6639 and tint +28. A little “warmer” than what the camera captured as you can see below.

Now the fun part, developing! My develop technique uses both the Develop Brick and the Tone Curve. Before I manipulate any of the Develop sliders I like to see what happens when I select the default Medium Tone Curve setting as I like more contrast in my images.
(Note: The Huelight CF High Leica M9 camera profile has the same effect as selecting the Medium Tone Curve)
I then make the adjustments to both the Develop Brick and Tone curve to get the look I like.

Now its time to work on the sky and bring out some detail in the clouds. This is when I use LR5’s Graduated Filter. In this image since the top left corner of the image is darker than the right top corner I’ve angled the Graduated Filter over the top left corner:

Once I’m happy with how I’ve adjusted the sky in the upper right half of the image I add a vignette that I already have saved a preset for:

The last thing I do is sharpen the image which I use another preset I have saved and you have my final image.


Thank you.
LikeLike